
Quick Start Guide
Fill with water and plug into standard power outlet.
Note: Please make sure that the power outlet is set to correct settings as per product specifications.
Place near open door or window.
Note: Evaporative Air Coolers work on evaporative cooling mechanism which requires cross ventilation.
Turn ON and enjoy the cooling breeze.
Note: Start with LOW speed and gradually increase to higher speed for optimum cooling performance.
User Tips
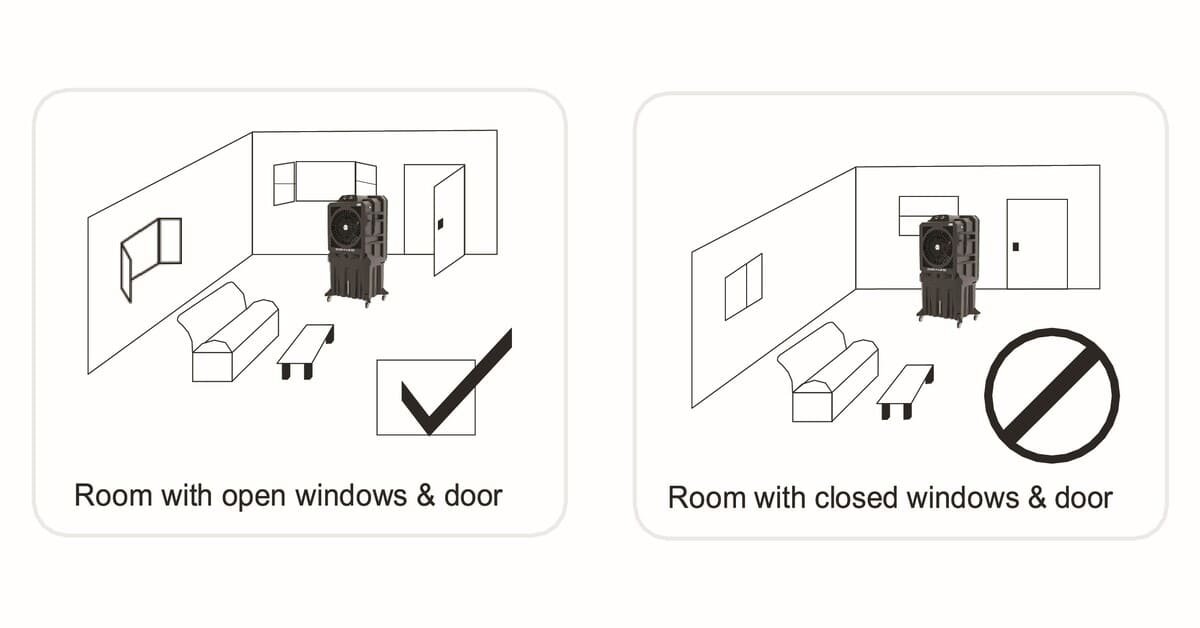
COOLER LOCATION (IMPORTANT TO READ)
Place the cooler in front of an open door or window. Ensure that there is adequate cross –
ventilation in the room by leaving adoor or window open opposite from the cooler.Following these rules will ensure your cooler will work as effectively as possible.
NATURAL, ENERGY, EFFICIENT, COOLING
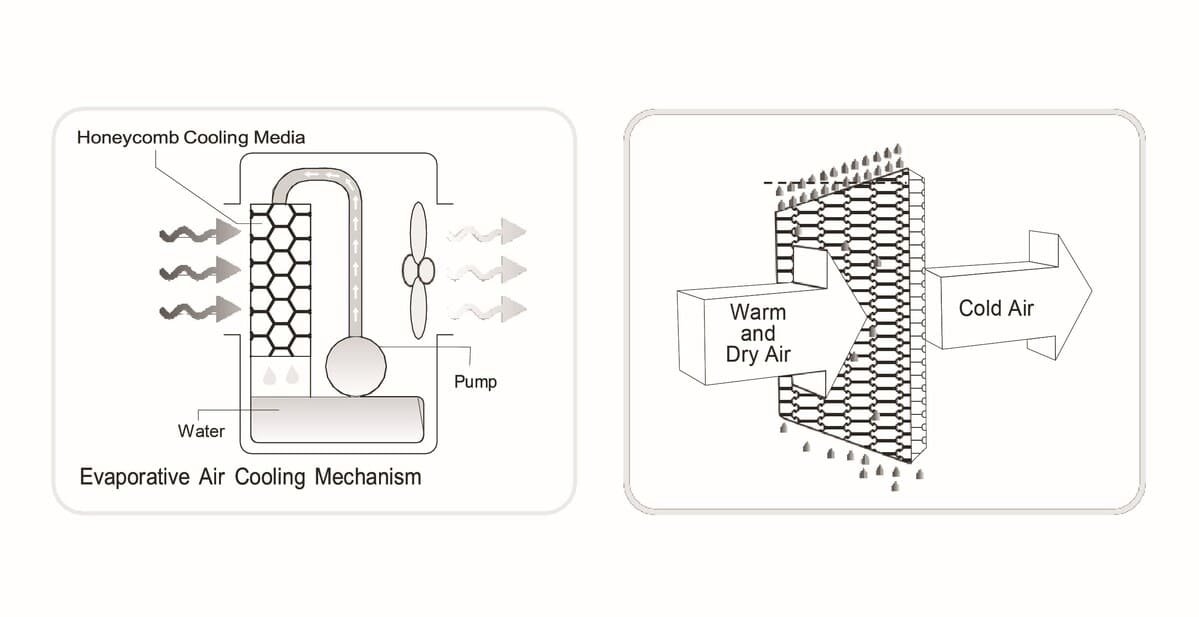
Evaporative air cooling is the natural way of cooling, similar to a breeze blowing across a lake. This breeze drops the temperature and has a relaxing cooling effect. The evaporative air cooler cools the air by means the evaporation of water. When water evaporates into the air, the result is a mixture of air and water molecules. This chemical change requires heat which is taken from the water molecules, resulting in cooler air propelled from the unit.
The recommended maximum relative humidity level is 60% or less, which allows a noticeable temperature decrease. The temperature decrease will be greater in drier climates because higher evaporation occurs when humidity is low.
The evaporative air cooler should not be used in enclosed spaces.It must be kept level and there must be water in the water tank.The room should have doors and windows opened to allow free air flow. The evaporative air cooler works best when placed near an open window, so that outside air is drawn into the evaporative air cooler, the air circulates in the room, then exits via the door. The maximum cooling effect is felt when a person is in the flow of air coming out of the evaporative air cooler. The evaporative air cooler can also be used to humidify dry air during cool weather. To be used for humidification the windows and doors should be closed to allow the humidified air to accumu – late. The evaporative air cooler is not an air conditioner as it does not use a compressor or refrigerant gas.
Note: When the product is used for the first time the Honeycomb cooling media will have an odor which will dissipate within a week of initial use.
Safety Rules
READ AND SAVE THESE INSTRUCTIONS:
When using electrical appliances, basic safety precautions should always be followed:
- Your cooler runs on 230V AC, 50Hz current. Check the house – hold voltage to ensure it matches the appliance’s rate specification.
- Before operating the product remove it from its packaging and check it is in good condition.
- DO NOT operate any product with a damaged cord or plug. We recommend not to use an extension cord with this appliance.
- DO NOT run power cord under carpeting or cover it with rugs or runners. Keep the cord away from areas where it may be tripped over.
- Always unplug the product before refilling the water tank.
- Always unplug the appliance from the power source before cleaning,
servicing or relocating the unit. - Remove the power cord from the electrical receptacle by grasping and pulling on the power cord plug – end only, never pull the cord.
- DO NOT use the product in areas where gasoline, paint or other flammable goods and objects are stored.
- When using the ”COOL” setting, please check the water tank to ensure it is full. Operation of this unit on the ”COOL” setting with an empty tank may result in damage to the water pump.
- DO NOT attempt to repair or adjust any electrical or mechanical functions of the cooler, as this may void the warranty.
- DO NOT cover the air inlet or outlet on the appliance as this may cause motor damage.
- DO NOT insert or allow objects to enter any ventilation or exhaust opening as this may damage the product and could cause an electrical shock or fire.
- DO NOT operate with the Honeycomb media removed as this will overload and damage the motor.
- DO NOT leave the appliance operating unattended for any extended period of time.
- DO NOT let children play with this appliance, packaging or plastic bags.
- If the unit is damaged or it malfunctions, do not continue to operate it. Refer to the troubleshooting section and /or please seek professional advice.
- Place the unit on a level floor.
- This product is not intended for use in wet or damp locations.
- Never locate the product where it may fall into a bathtub or other water container. DO NOT use in bathrooms or outdoors.
- When the unit is not in use always store in a dry area.
- This appliance is not intended for use by persons (including children or elderly) with reduced physical, sensory or mental capabilities, or lack of experience and knowledge, unless they have been given supervision or instruction concerning use of the appliance by person responsible for their safety.
- Always grip the side handles to move the unit.
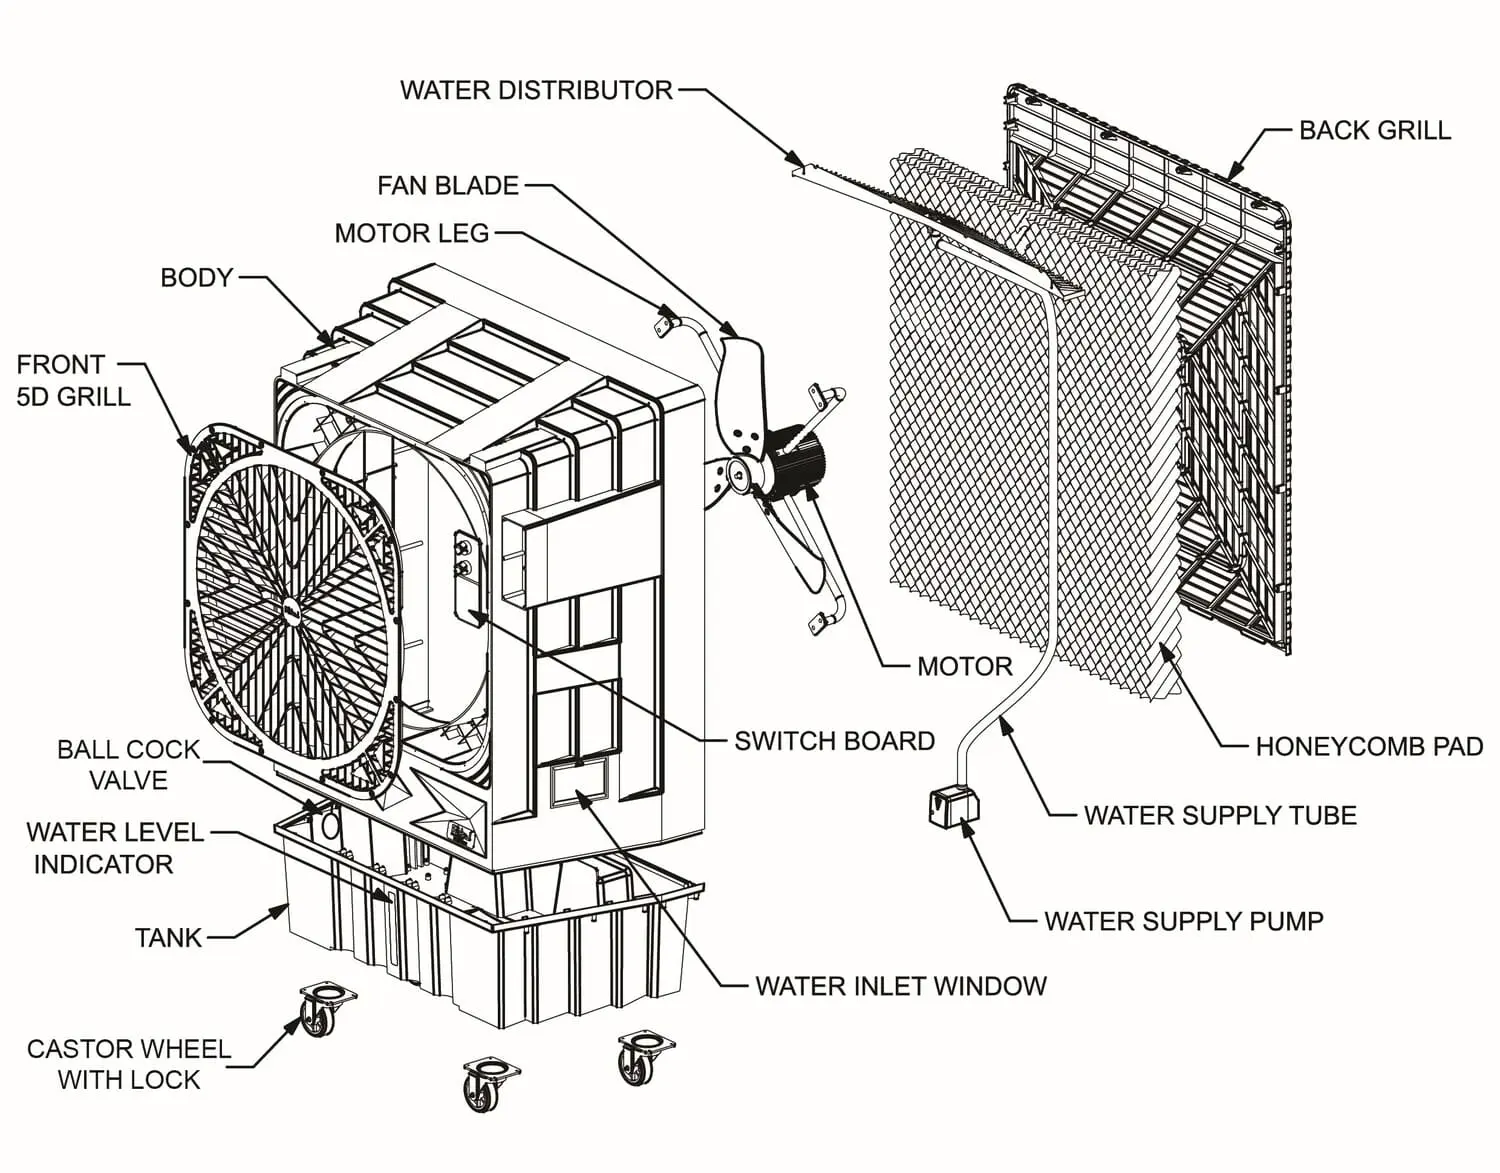
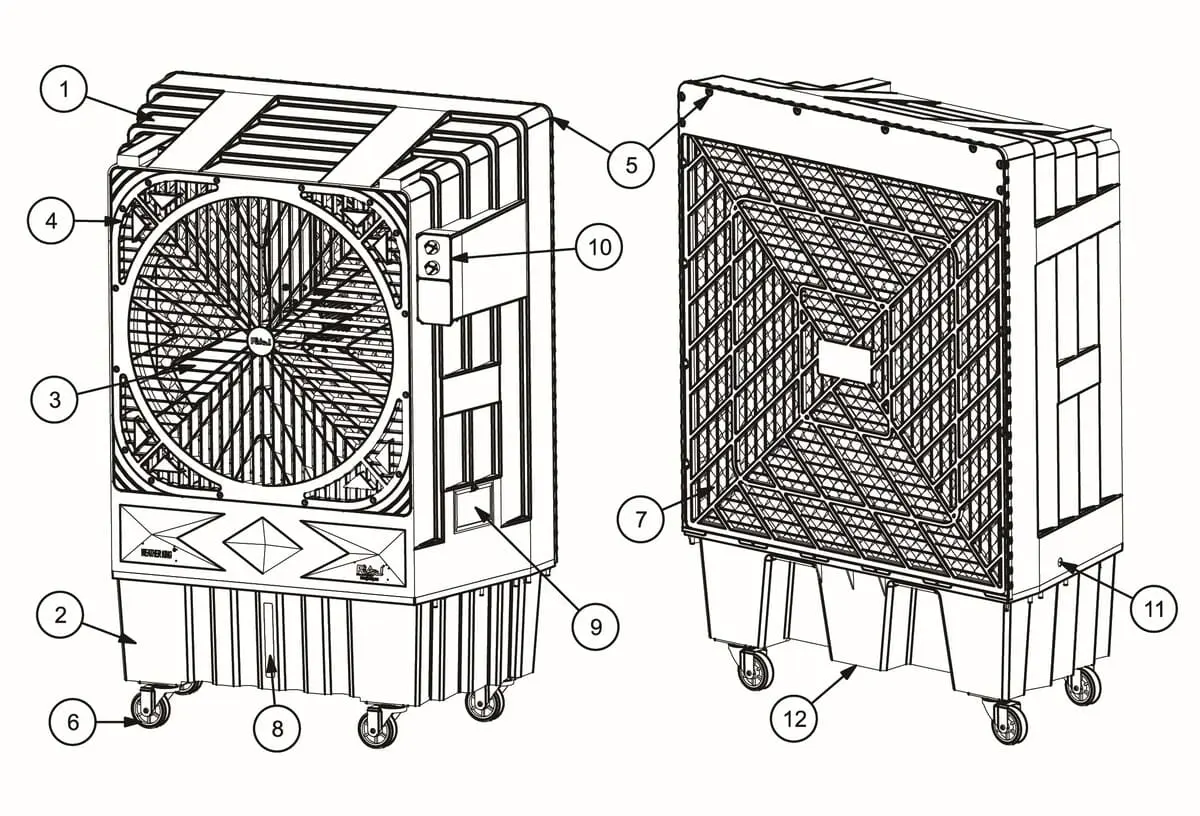
Parts Description
- FRONT BODY
- WATER TANK
- FAN BLADE
- FRONT SD GRILL
- BACK GRILL
- CASTOR WHEEL WITH LOCK
- HONEYCOMB COOLING PAD
- WATER LEVEL INDICATOR
- WATER INLET WINDOW
- SWITCH BOARD
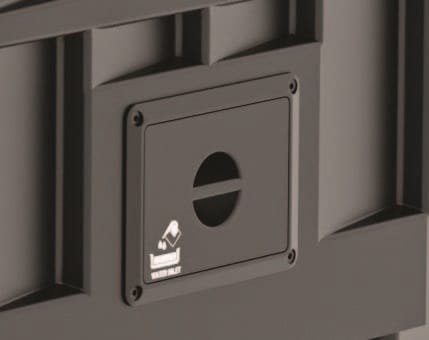
- WATER INLET(BALL COCK VALVE)
- DRAINAGE
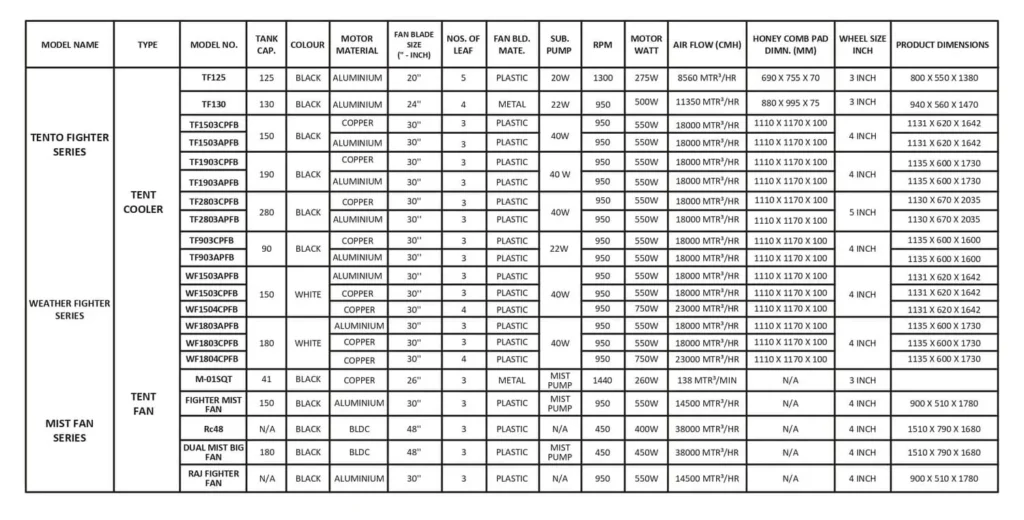
Specifications
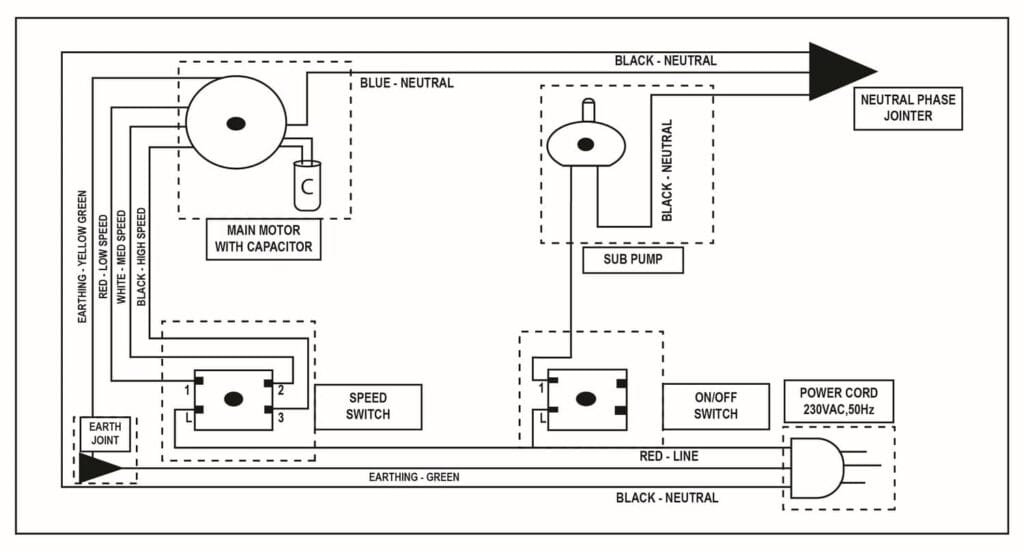
WIRING DIAGRAM
Use & Operation
FILL WATER (Manually OR INLET PIPE)
- Open (Slide – out) the water fill door located on the left side of the unit and fill water inside the tank.
- Optionally, you may also fill water or load ice from the water/ice inlet located on the top besides the control panel.
- Loading the ice in the ice inlet compartment, will help to improve the cooling efficiency
- Check Max. Level of water on the Water Level Indicator. Always check water level in the tank before running the “COOL” function.
- Always make sure water in the tank is above the Min. Water level mark.
- Running the unit with inadequate water may cause pump failure.
CAUTION
Unplug from power when refilling.
NOTE
Speed control may be marked as High / Med / Low in certain units.
Use & Operation
CONTROL PANEL
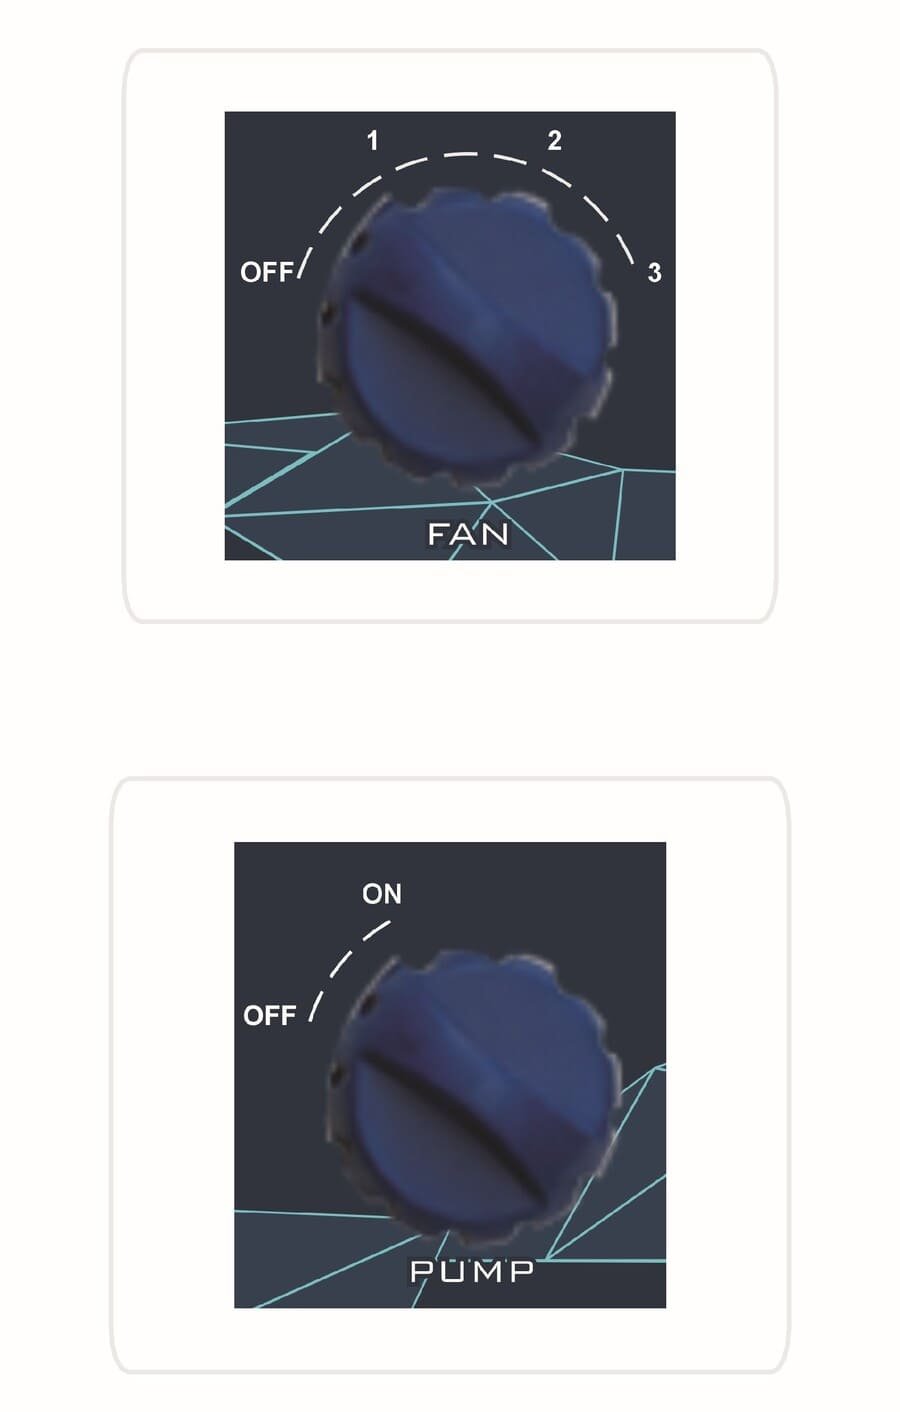
Speed Controller :-
Speed Control Settings
- Speed 1: Slow, precise control.
- Speed 2: Balanced, efficient performance.
- Speed 3: Fast, powerful operation.
Pump Controller :-
The Pump Controller features a simple on/off operation:
- ON Button: Activates the pump.
- OFF Button: Deactivates the pump.
For safe and efficient operation, ensure the pump is turned off when not in use.
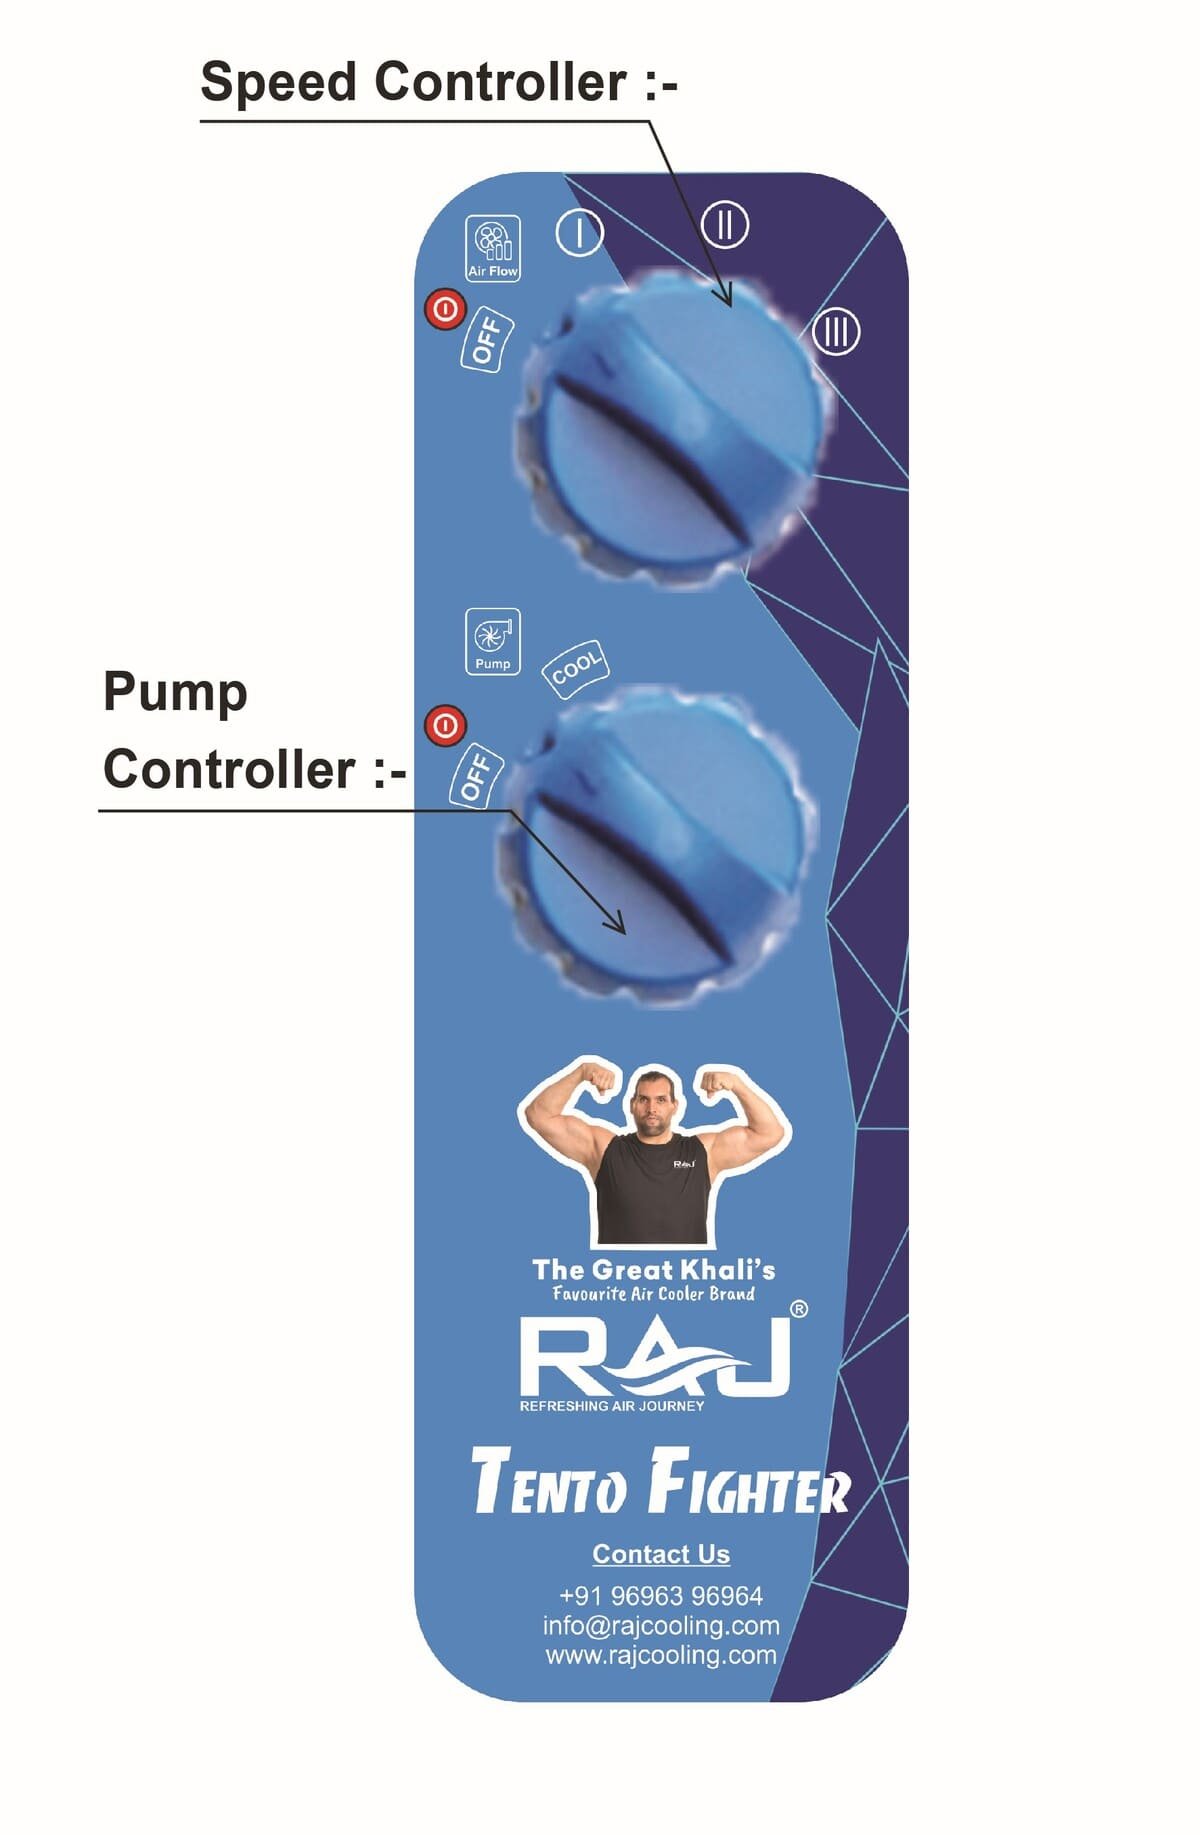
CONTROL KNOBS
Speed Control Knob
Adjust the fan speed to your comfort with this knob. Choose from low (1), medium (2), or high (3) speeds to suit your cooling needs.
Pump Control Button (ON/OFF)
Control the water pump with this knob. Turn it “ON” to initiate the cooling process and “OFF” to stop the pump when not needed.
Cleaning & Maintenance
WARNING
- Before cleaning the unit, switch it to the ”off” position and remove the plug from the power socket.
- To clean the outside, use a damp cloth to remove dirt and dust.
- Never use detergents, corrosive elements or any chemicals to clean this product.
- When the product is not in use, store the unit in a dry place out of direct sunlight.
CLEANING AND DRAINING THE WATER TANK
- Turn the power “off” and disconnect the unit from power supply.
- Move the unit to a location where it can be drained and remove the drainage tube/cap (see parts description on page 7).
- Never use detergents, corrosive elements or any chemicals to clean this product.
- Once the tank is clean, refill the water tank. The unit is now ready to be used again.
MAINTAINING & CHANGING THE HONEYCOMB
- The appliance is supplied with Honeycomb cooling media.
- The cleaning frequency for the Honeycomb media depends on local air and water conditions. In areas where the mineral content of water is high, mineral deposits may build up on the honeycomb cooling media and restrict air flow. Draining the water reservoir and refilling with fresh water at least once a week will help reduce mineral deposits. If mineral deposits remain on the Honeycomb media, the media should be removed and washed under fresh water. The media should be cleaned every two months or sooner, depending on your needs.
- Do not run the unit in COOL mode with stale water in the tank. It is recommended to empty the tank and refill it with fresh water if the water has been standing in the tank for an extended period of time.
- For best results, allow the honeycomb cooling media to dry after each use by turning off the cool function 15 minutes before turning the unit off.
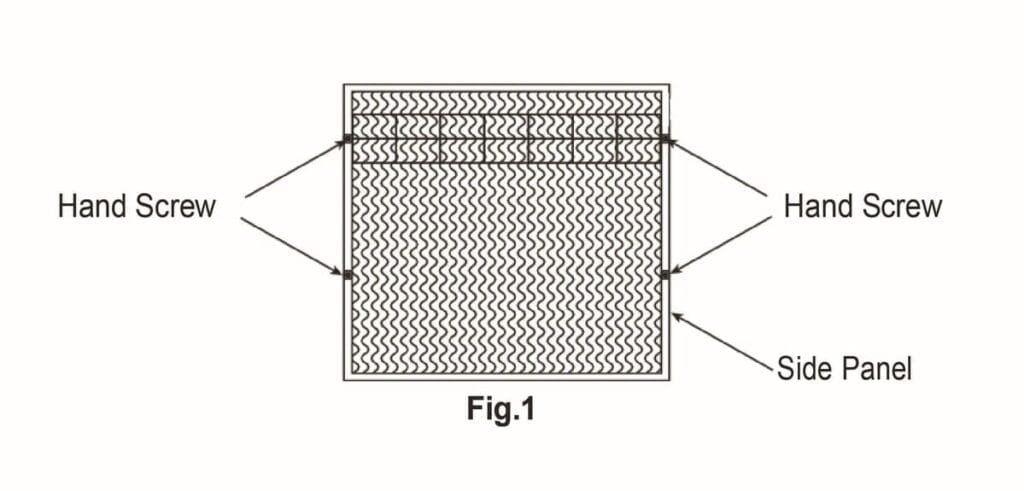
- To change the Honeycomb, remove the hand screws which hold the side panel (Refer Fig.1). Remove the Honeycomb holder and replace the Honeycomb. Refix the Honeycomb holder wheel and screw back the panel to the unit.
NOTE:
- This unit is supplied with three (3) Honeycomb Cooling Media’s Located on the back & two sides. The removal procedure for all the media’s is same as explained above.
Troubleshooting Guide
PROBLEM
No discharge of air
POSSIBLE CAUSE
SOLUTION
Make sure power cord is plugged in and the supply switch in ON.
Try to turn the unit ON by pressing
buttons on control panel or remote
control.
Not Cooling / Unit is making noise
Pump is not turned ON.
Turn on COOL function from remote or control panel.
Contact service center
Odour omission
Old Unit.
When the unit is used for the
first time, the Honeycomb cooling media will have an odour, which will dissipate within a week of initial use.
There may be an algae issue, Replace the honeycomb cooling media. Contact service center
Disposal
- End-of-life disposal of the product should be done through a government authorized reprocess dealer, duly authorized for dealing with used products scrap and recycling.
- The product or its parts must not be disposed in the routine garbage bins.
Service And Warranty
SERVICE AND WARRANTY
This appliance is warranted for one year against all manufacturing defects from the date of sale. In the event of any complaint, please contact your nearest Company Service Centre or call at our Toll – Free no: 1800 123 5768
This Warranty is valid only when…
- The appliance has not been opened or tempered with, any unauthorized person.
- The warranty card or cash memo duly signed by the authorized dealer are presented the complaint.
- The appliance has been installed, used and maintained in accordance with the instructional manual.
This Warranty does not apply for…
- Damages due to chipping, peeling, plating and denting.
- Breakage or damage to components made out of Bakelite, Urea, ABS, SAN and such plastic, materials, rubber parts and cord.
- Normal wear and tear of parts.
- Damage resulting from accidents, mishandling or negligence on part of the customer.