
Air coolers are one of the most cost-effective ways to stay comfortable, but their performance largely depends on how well you maintain the honeycomb cooling pads. These pads hold water, and when air passes through them, evaporation creates a cooling effect. Over time, they collect dust, dirt, and mineral deposits, which can reduce airflow and cooling efficiency. Did you know? Dirty honeycomb pads can cut your cooler’s performance by nearly 40% while also causing foul odors and higher water consumption. The good news is you can clean them easily at home with just a few simple steps.
Why Regular Cleaning of Honeycomb Pads is Important
Honeycomb pads are designed to last anywhere between five to seven years if they are maintained properly. However, in real-world conditions, dust particles and salts present in the water gradually choke the pad. This not only reduces cooling efficiency but also shortens the pad’s lifespan to just three or four years. Regular cleaning prevents such early wear and tear, ensures steady airflow, and helps the cooler maintain its original performance. In areas with high pollution, excessive dust, or saline water containing minerals like fluoride, the pads may require more frequent maintenance than usual. A simple cleaning routine every month, or more often if conditions demand, can make a big difference in the durability and effectiveness of your cooler.
Signs That Your Honeycomb Pads Need Cleaning
One of the first signs of a clogged honeycomb pad is weaker cooling performance. The cooler may still run, but the air won’t feel as chilled as before. Another noticeable sign is a musty or unpleasant odor, which indicates that dust, bacteria, or stagnant water has built up within the pad. In some cases, you may even see visible dirt, salt deposits, or algae growth, which clearly show that the pad is dirty. Increased water consumption is also common when the pad is blocked, as the cooler needs to circulate more water to keep it moist. If you experience any of these issues, it’s time to give your pads a proper cleaning.
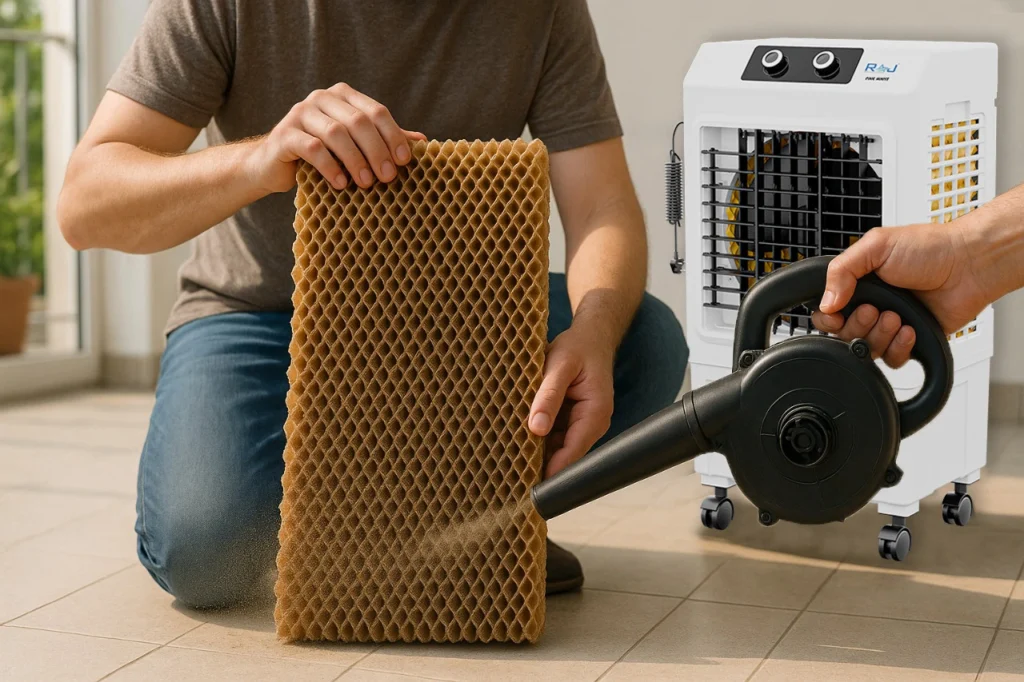
Step by Step Guide: Cleaning Honeycomb Pads at Home
Start by ensuring safety switch off the power supply and unplug the cooler before removing the pads. Take out the honeycomb pads carefully to avoid bending or damaging them. Once the pads are removed, place them in a shaded, airy spot and allow them to dry completely. This step is important because moisture makes dust cling to the pad surface.
When the pads are fully dry, use a small blower or a household hair dryer on a cool or low setting to gently blow away the dust particles. This method is safe, effective, and prevents any damage to the delicate honeycomb structure. Always move the blower or hair dryer evenly across the surface so that all dust is cleared out. Avoid pressing the pad or using forceful scrubbing, as honeycomb pads are made from treated cellulose paper and can get damaged if handled roughly.
Once cleaned, reinstall the pads back into the cooler and ensure they are properly fitted. Don’t forget to also clean the water tank and cooler body, since dust and dirt in the tank can quickly transfer back to the pads.
Do’s and Don’ts While Cleaning
When it comes to honeycomb pads, gentle handling is the golden rule. Always let the pads dry completely before cleaning, and use only a blower or hair dryer to remove dust. Cleaning the pads once every two to three weeks during heavy summer use is enough to maintain airflow and cooling performance.
On the other hand, avoid using soap, vinegar, acid, or any harsh chemicals, as they can damage the cellulose material. Never wash honeycomb pads under running water or with high-pressure sprays, because water can weaken the glue and shorten pad life. Do not scrub the pads with brushes, as even gentle scrubbing may harm the honeycomb design. And fina
Maintenance Tips for Long Pad Life
While cleaning is essential, honeycomb pads will eventually wear out. Even with good care, it’s best to replace them every one to two seasons in areas with heavy use, or sooner if you notice significant scaling and damage. Always use clean water in your cooler to prevent mineral deposits from forming quickly. Cover your cooler when it’s not in use to keep out dust and debris. By sticking to a regular cleaning schedule and monitoring pad condition, you can enjoy consistent cooling throughout the summer and extend the lifespan of your cooler.
Conclusion
Cleaning honeycomb pads is not just about boosting cooling efficiency, it’s about creating healthier air, reducing energy consumption, and extending the life of your air cooler. With simple household tools like a brush, vinegar, or soap, and occasional deeper cleaning with careful techniques, you can restore your cooler’s performance in no time. Regular maintenance ensures your pads last closer to their natural lifespan of five to seven years, rather than wearing out prematurely. This summer, keep your cooler fresh, efficient, and ready to beat the heat with regular honeycomb pad care.