Fill with water and plug into standard power outlet.
Note: Please make sure that the power outlet is set to correct settings as per product specifications.
Place near open door or window.
Note: Evaporative Air Coolers work on evaporative cooling mechanism which requires cross ventilation.
Turn ON and enjoy the cooling breeze.
Note: Start with LOW speed and gradually increase to higher speed for optimum cooling performance.
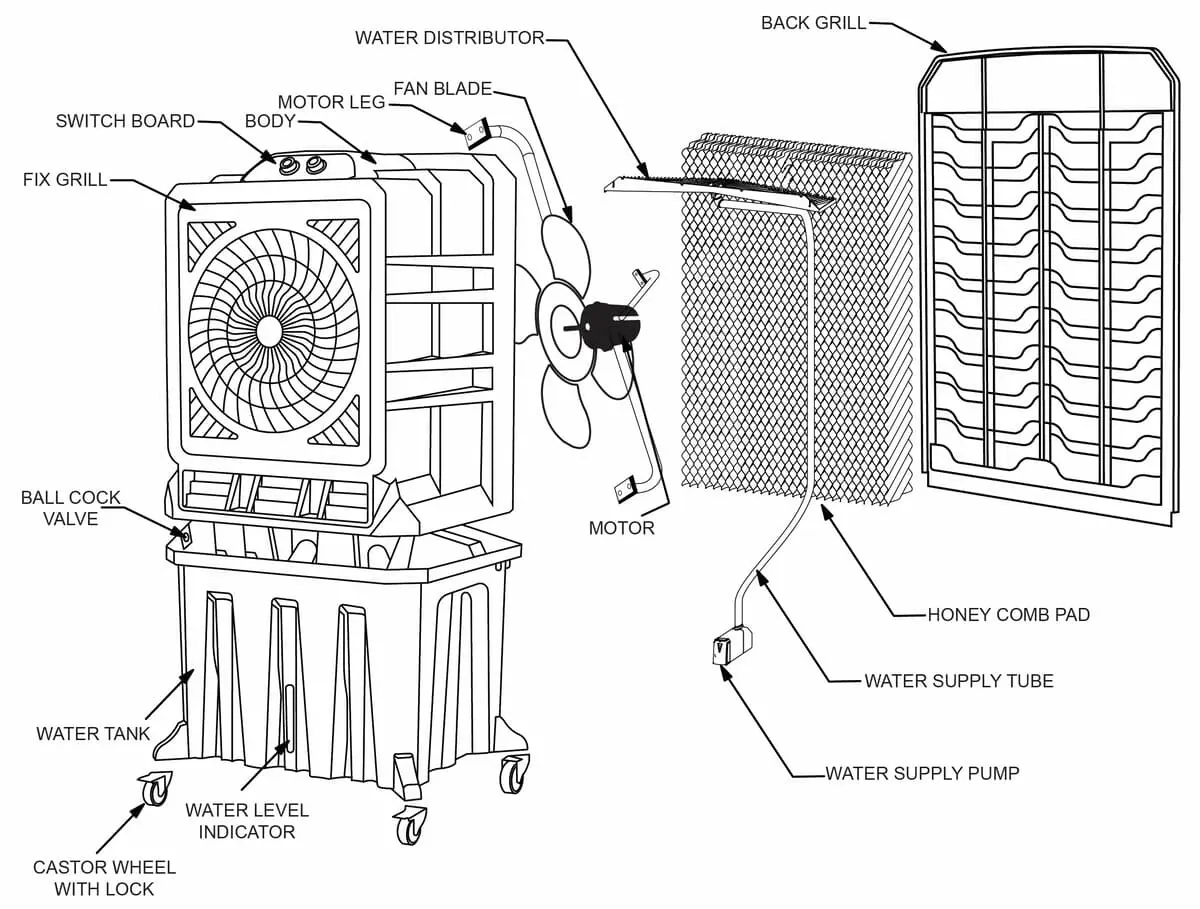
Parts Description
Use & Operation
INSTALLATION
Place your Air Cooler at least 20 cm away from wall or any other obstruction. The Cooler should be placed near a window/door to allow in fresh air. The Cooler has been provided with inbuilt wheels for easy mobility.
Always ensure that there is another open window/door through which warm air can exhaust from the room. Constant air change is very essential for fresh air cooling by your Air cooler.
Plug in the mains cord of your Cooler to a wall socket. Ensure the supply of socket should be in OFF Position while plugging.
While plug in the mains cord please ensure that phase (L), neutral (N) & Earthing (E) of the mains cord should match with the phase and neutral of the socket as per standard.
GETTING STARTED
Install the cooler as per Installation procedure
FILLING OF WATER: Just fill water tank (as per tank capacity) of your air cooler through the ice chamber. The water level will be viewed through lens. It is advisable to use tumbler / jar to fill the water to ensure no spillage. Ensure the power point is OFF while filling water.
POWER SUPPLY: Ensure that your Air cooler is plugged into specified Voltage & Frequency outlet and Switch ‘ON’ the power supply.
PRE SOAKING: Before putting on the Cooler fan, it is advisable to run pump for few minutes by rotating FUNCTION KNOB, This will ensure uniform Soaking of cooling media & avoid sprinkling of water if any. Soaking time must be 2 to 3 min.
BETTER PERFORMANCE: For better air blast run the cooler on high speed. Run the cooler on low speed to get better cooling & low noise level.
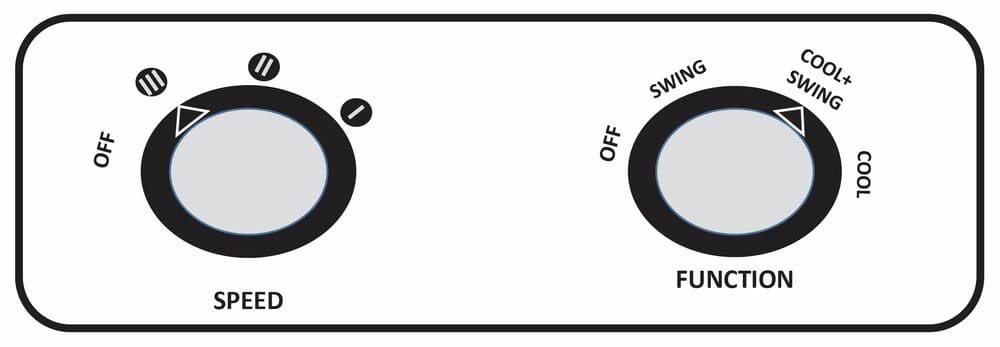
SWITCH CONTROL PANEL
SWITCH CONTROL PANEL
CONTROL
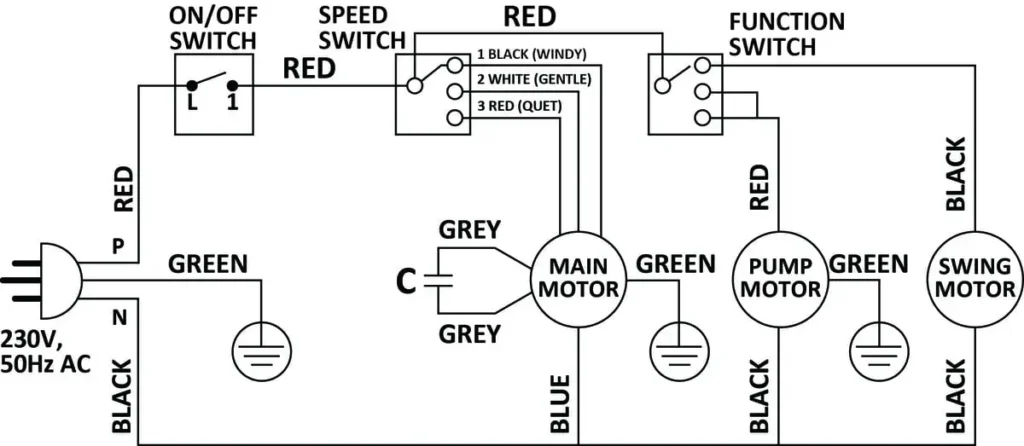
Three speed level can control. High speed at ” III ” location, Med speed at ” II ” & Low speed at ” I “.
Three mode of funcon switch – At ‘COOL” mode only sub pump operate. At “COOL+SWING” mode sub pump & swing motor both are operate. At “SWING” mode only swing motor operate.
In three switch control panel wiring controlling “ON/OFF”. motor speed control & function control.
Specification
Cleaning & Maintenance
SAFETY PRECAUTIONS
Always disconnect mains supply before filling water.
Do not try to fill the water into the cooler when in operation.
Do not move the cooler rapidly when there is water in the tank.
Always disconnect mains before opening panels.
Be particular & careful when using the cooler near curtains.
Children must not be allowed to operate / play with cooler.
OPERATIONAL CARE
OPERATIONAL CARE :-
When your Air Cooler is not in operation, make sure to switch all the switches to OFF Position.
Operate the buttons smoothly
Do not wipe the cooler with harsh chemicals, scrubbing powder or thinner as they will damage the body.
Do not keep heavy load on the top of your Air Cooler.
Do not add any bleaching agents & fragrance content into the water in the tank.
Before moving or relocating the cooler ensure that the mains cord is unplugged and that the water tank is empty.
Do not immerse the unit in water.
Do not use any cleaning chemicals such as detergents and abrasives.
REGULAR MAINTENANCE:
It is recommended to drain the Cooler and clean the cooling pads every month.
Replace the HONEYCOMB PAD once in two/three years.
After the summer season ensure that the water is drained off completely & pads are dried before storage.
When the product is not in use, store the cooler in a dry place out of direct sunlight.
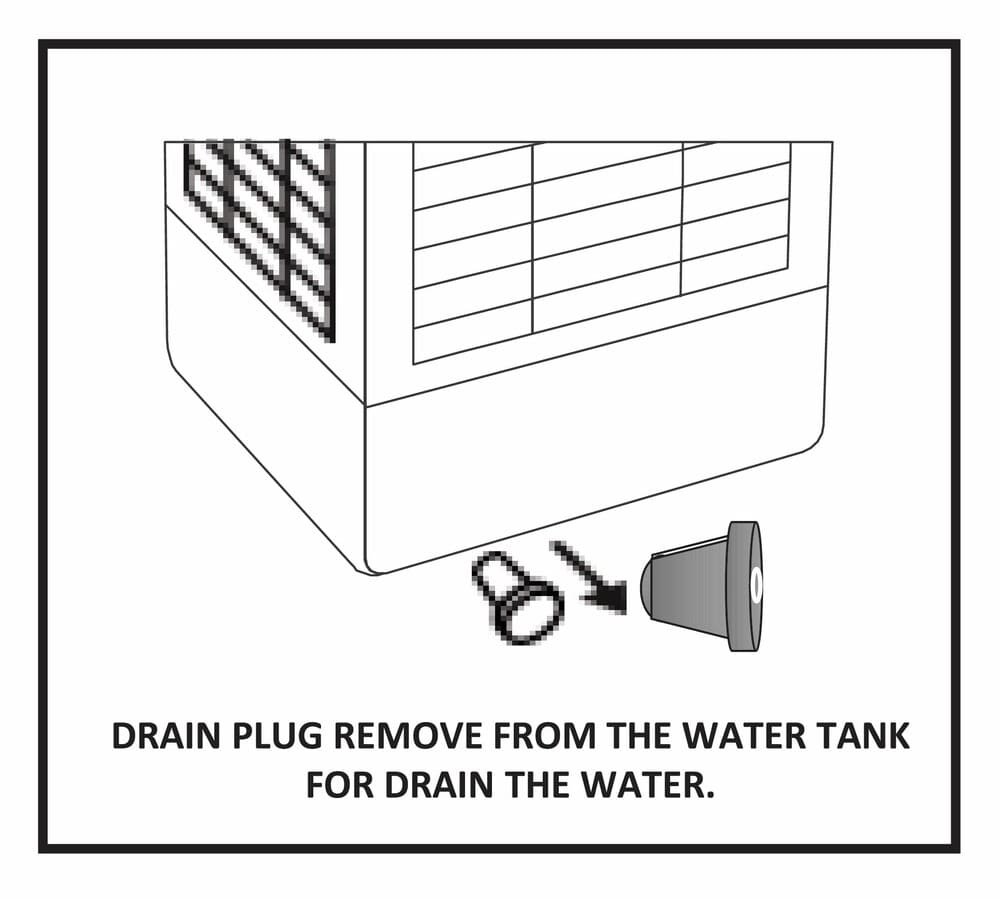
CLEANING OF COOLER BY DRAINING WATER:
Turn the power “off” and disconnect the unit from power supply.
Move the cooler to a location where it can be drained and remove the drain plug from bottom.
Once the tank is empty, refill with clean water and drain it again.
This should be repeated weekly to maintain the integrity of the cooler.
Once the tank is clean, refill the water tank. The unit is now ready to be used again.
TROUBLE SHOOTING
If Air cooler fails to operate, please check the following before calling for service.
Please check that there is electric supply & earthing connection at the power point by trained electrician.
Please check that the power point is switched ‘ON’ and that the plug is in its place correctly. Please check that the controls are set properly.
Disposal
End-of-life disposal of the product should be done through a government authorized reprocess dealer, duly authorized for dealing with used products scrap and recycling.
The product or its parts must not be disposed in the routine garbage bins.
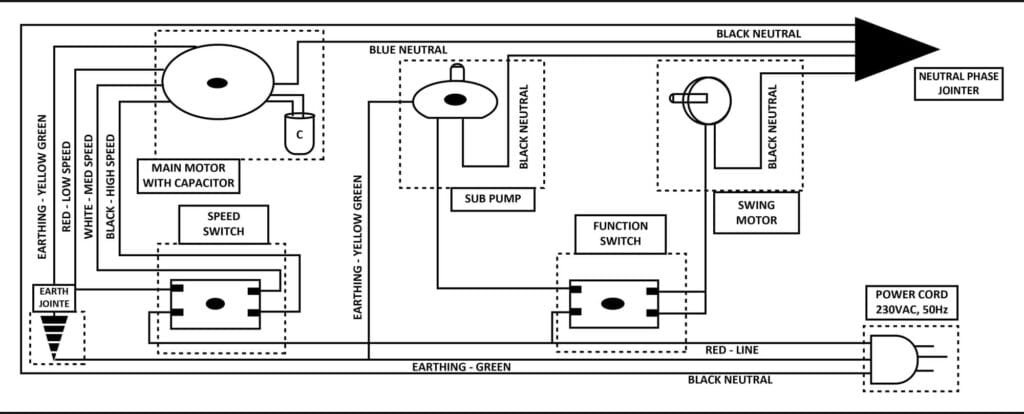
Wire Diagram
WIRING DIAGRAM (2 Pin Diagram)
WIRING DIAGRAM (3 Pin Diagram)
Service And Warranty
SERVICE AND WARRANTY
This appliance is warranted for one year against all manufacturing defects from the date of sale. In the event of any complaint, please contact your nearest Company Service Centre or call at our Toll – Free no: 1800 123 5768
This Warranty is valid only when…
The appliance has not been opened or tempered with, any unauthorized person.
The warranty card or cash memo duly signed by the authorized dealer are presented the complaint.
The appliance has been installed, used and maintained in accordance with the instructional manual.
This Warranty does not apply for…
Damages due to chipping, peeling, plating and denting.
Breakage or damage to components made out of Bakelite, Urea, ABS, SAN and such plastic, materials, rubber parts and cord.
Normal wear and tear of parts.
Damage resulting from accidents, mishandling or negligence on part of the customer.